


Creating a successful blog involves more than just writing quality content; it also requires effective SEO practices to ensure your posts reach a wider audience. But how to remove noindex tag in WordPress? One crucial aspect of SEO is understanding how indexing works and how to manage it effectively on your WordPress site.
What is the noindex Tag?
The noindex tag is an HTML meta tag that tells search engines not to index a particular page. When a page has a noindex tag, search engines like Google won’t display that page in search results. While this can be useful for certain types of content, it can be detrimental if applied incorrectly.
Importance of Indexing for SEO
Indexing is vital for SEO because it allows search engines to crawl and display your content in search results. Proper indexing helps improve your site’s visibility, driving more organic traffic to your blog. If your important pages are not indexed, potential readers won’t find them through search engines, which can hinder your blog’s growth.

When Should You Use the noindex Tag?
The noindex tag should be used selectively. It’s ideal for pages that don’t add value to search engine results, such as admin login pages, duplicate content, or private information. However, applying it to the wrong pages can significantly impact your SEO efforts, making it essential to know when and how to use this tag wisely.
Why Remove the noindex Tag in WordPress?
Incorrectly applied noindex tags can have severe consequences for your blog’s SEO. Understanding why you should remove them can help you make informed decisions.
Potential Impacts on SEO
Having important pages marked with a noindex tag means those pages won’t appear in search results. This can lead to a decrease in organic traffic, lower rankings, and reduced visibility for your blog. Removing unnecessary noindex tags ensures that search engines can properly index your valuable content.
Common Scenarios for Removing noindex
You might find noindex tags on pages that were previously private or experimental but are now ready for public viewing. Another common scenario is when SEO plugins accidentally apply noindex tags to important pages. Identifying and removing these tags can help restore your site’s visibility.
Benefits of Proper Indexing
Proper indexing can boost your blog’s search engine rankings, making your content more accessible to readers. It also enhances the overall user experience by ensuring that relevant pages appear in search results. With better indexing, you can drive more traffic, improve engagement, and achieve your blogging goals.

How to Identify the Presence of a noindex Tag
Before you can remove a noindex tag, you need to identify where it exists on your site. Here are several methods to do this.
Using Browser Developer Tools
Most modern browsers come with built-in developer tools that allow you to inspect the HTML of your web pages. By right-clicking on a page and selecting “Inspect,” you can search for the noindex tag within the page’s meta tags.
Using SEO Tools and Plugins
SEO tools like Yoast SEO and All in One SEO Pack often highlight pages with noindex tags. These tools can provide a comprehensive overview of your site’s indexing status, making it easier to identify problematic tags.
Checking the Source Code
Another way to find noindex tags is to check your pages’ source code. Simply view the page’s source in your browser and search for “noindex.” This method can be time-consuming but is very effective for pinpointing where the tags are located.
Methods to Remove the noindex Tag in WordPress
There are several ways to remove a noindex tag from your WordPress site. Each method has its steps and considerations.
Method 1: Edit Yoast SEO’s Advanced Settings
Yoast SEO is a popular plugin that many WordPress users rely on to manage their site’s SEO. Here’s how to remove the noindex tag using Yoast SEO.
Step-by-step Guide
- Navigate to the “SEO” menu in your WordPress dashboard and select “Search Appearance.”
- Click on the “Content Types” tab.
- Locate the content type (post, page, etc.) that has the noindex tag.
- Toggle the “Show in search results?” option to “Yes.”
- Save your changes.
Common Issues and Troubleshooting
Sometimes, changes may take time to reflect due to caching. Clear your site’s cache and check again. If the noindex tag persists, ensure that other SEO settings or plugins do not conflict with Yoast SEO.

Method 2: Delete the HTML Meta Tag
If the noindex tag is hard-coded into your theme, you’ll need to remove it manually.
Locating the Meta Tag in the Header
First, locate the meta tag by inspecting the page’s source code. The noindex tag is usually found within the `<head>` section.
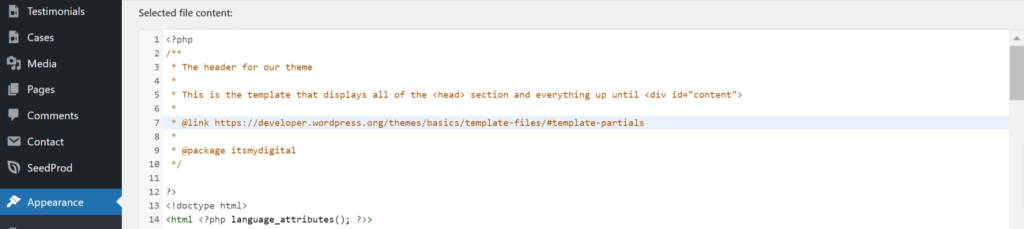
Editing the header.php File
- Go to “Appearance”> “Theme Editor” in your WordPress dashboard.
- Open the “header.php” file.
- Search for the noindex meta tag and delete it.
- Save your changes.
Risks and Precautions
Editing theme files directly can be risky. Always back up your site before making changes, and consider using a child theme to avoid losing customizations during theme updates.
Method 3: Delete the noindex Directive from the header.php File
Another common place for the noindex directive is within the header.php file. Here’s how to remove it.
Understanding the header.php File Structure
The header.php file contains the code that builds the top part of your site. Understanding its structure will help you locate and edit the noindex directive.
Removing the noindex Directive
- Open the “header.php” file through the Theme Editor.
- Locate the noindex directive within the `<head>` section.
- Delete the directive and save your changes.
Testing Changes
After making changes, check your page’s source code to ensure the noindex tag has been removed. Use SEO tools to verify that the page is now indexable.
Method 4: Add a Custom Function in functions.php
For a more programmatic approach, you can add a custom function to your site’s functions.php file.
Writing a Custom Function
Write a function that removes the noindex tag from your site’s pages. This function can be tailored to your specific needs.
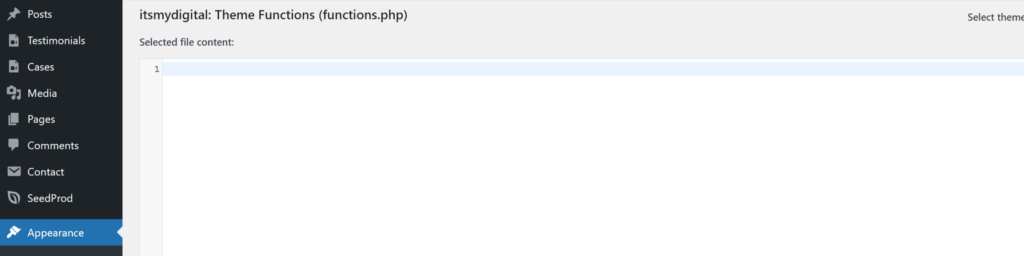
Adding the Function to functions.php
- Go to “Appearance”> “Theme Editor.”
- Open the “functions.php” file.
- Add your custom function at the end of the file.
- Save your changes.
Verifying the Results
Check your site to ensure the function is working correctly. Use browser tools and SEO plugins to confirm the noindex tag has been removed.
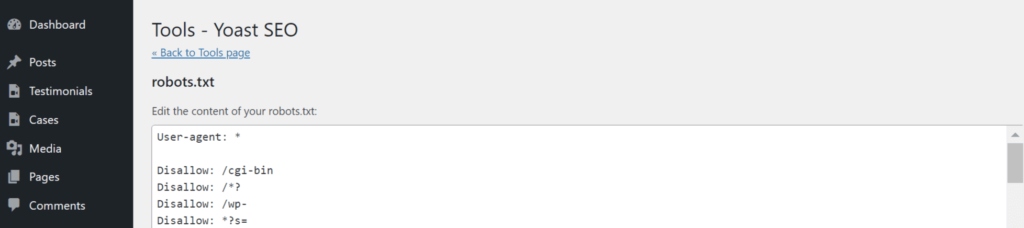
Method 5: Delete the Disallow Directive from robots.txt
The robots.txt file is another place where noindex directives can lurk.
Understanding robots.txt
The robots.txt file instructs search engine crawlers on how to interact with your site. It can contain directives that prevent indexing.
Locating and Editing robots.txt
- Access your site’s files via FTP or your hosting provider’s file manager.
- Locate the “robots.txt” file in the root directory.
- Open the file and look for any disallow directives.
- Delete any lines containing “Disallow” for pages you want indexed.
- Save your changes.
Testing and Verification
Use tools like Google Search Console to test and verify that your changes have been implemented correctly. Ensure that the pages are now being indexed.
Advanced Techniques for Managing Indexing
Once you’ve handled the basics, there are advanced techniques you can use to manage your site’s indexing more effectively.
Using Google Search Console
Google Search Console is a powerful tool that provides insights into how Google indexes your site. Use it to monitor indexing status, request indexing of new pages, and identify any issues.
Implementing Schema Markup for Better Indexing
Schema markup helps search engines understand your content better, leading to improved indexing. Implementing schema can enhance your site’s search presence and provide rich results.
Monitoring and Auditing Your Site’s Indexing Status
Regularly audit your site’s indexing status to ensure everything is running smoothly. Use SEO tools and analytics to monitor performance and make necessary adjustments.
Best Practices for Indexing in WordPress
To maintain optimal indexing, follow these best practices.
Regularly Auditing Your Site
Perform regular audits to check for any indexing issues. This includes monitoring for noindex tags, checking robots.txt, and ensuring all important pages are indexable.
Using SEO Plugins Effectively
SEO plugins like Yoast SEO and All in One SEO Pack are invaluable tools. Use them to manage your site’s SEO settings, monitor performance, and make data-driven decisions.
Keeping Up with SEO Updates and Guidelines
SEO is an ever-evolving field. Stay informed about the latest updates and guidelines from search engines to ensure your site remains compliant and optimized.
To remove a noindex tag from your WordPress site, follow these steps:
- Navigate to the “SEO” menu in your WordPress dashboard and select “Search Appearance.”
- Click on the “Content Types” tab.
- Locate the content type (post, page, etc.) that has the noindex tag.
- Toggle the “Show in search results?” option to “Yes.”
- Save your changes.
- Clear your site’s cache and verify that the changes have taken effect.